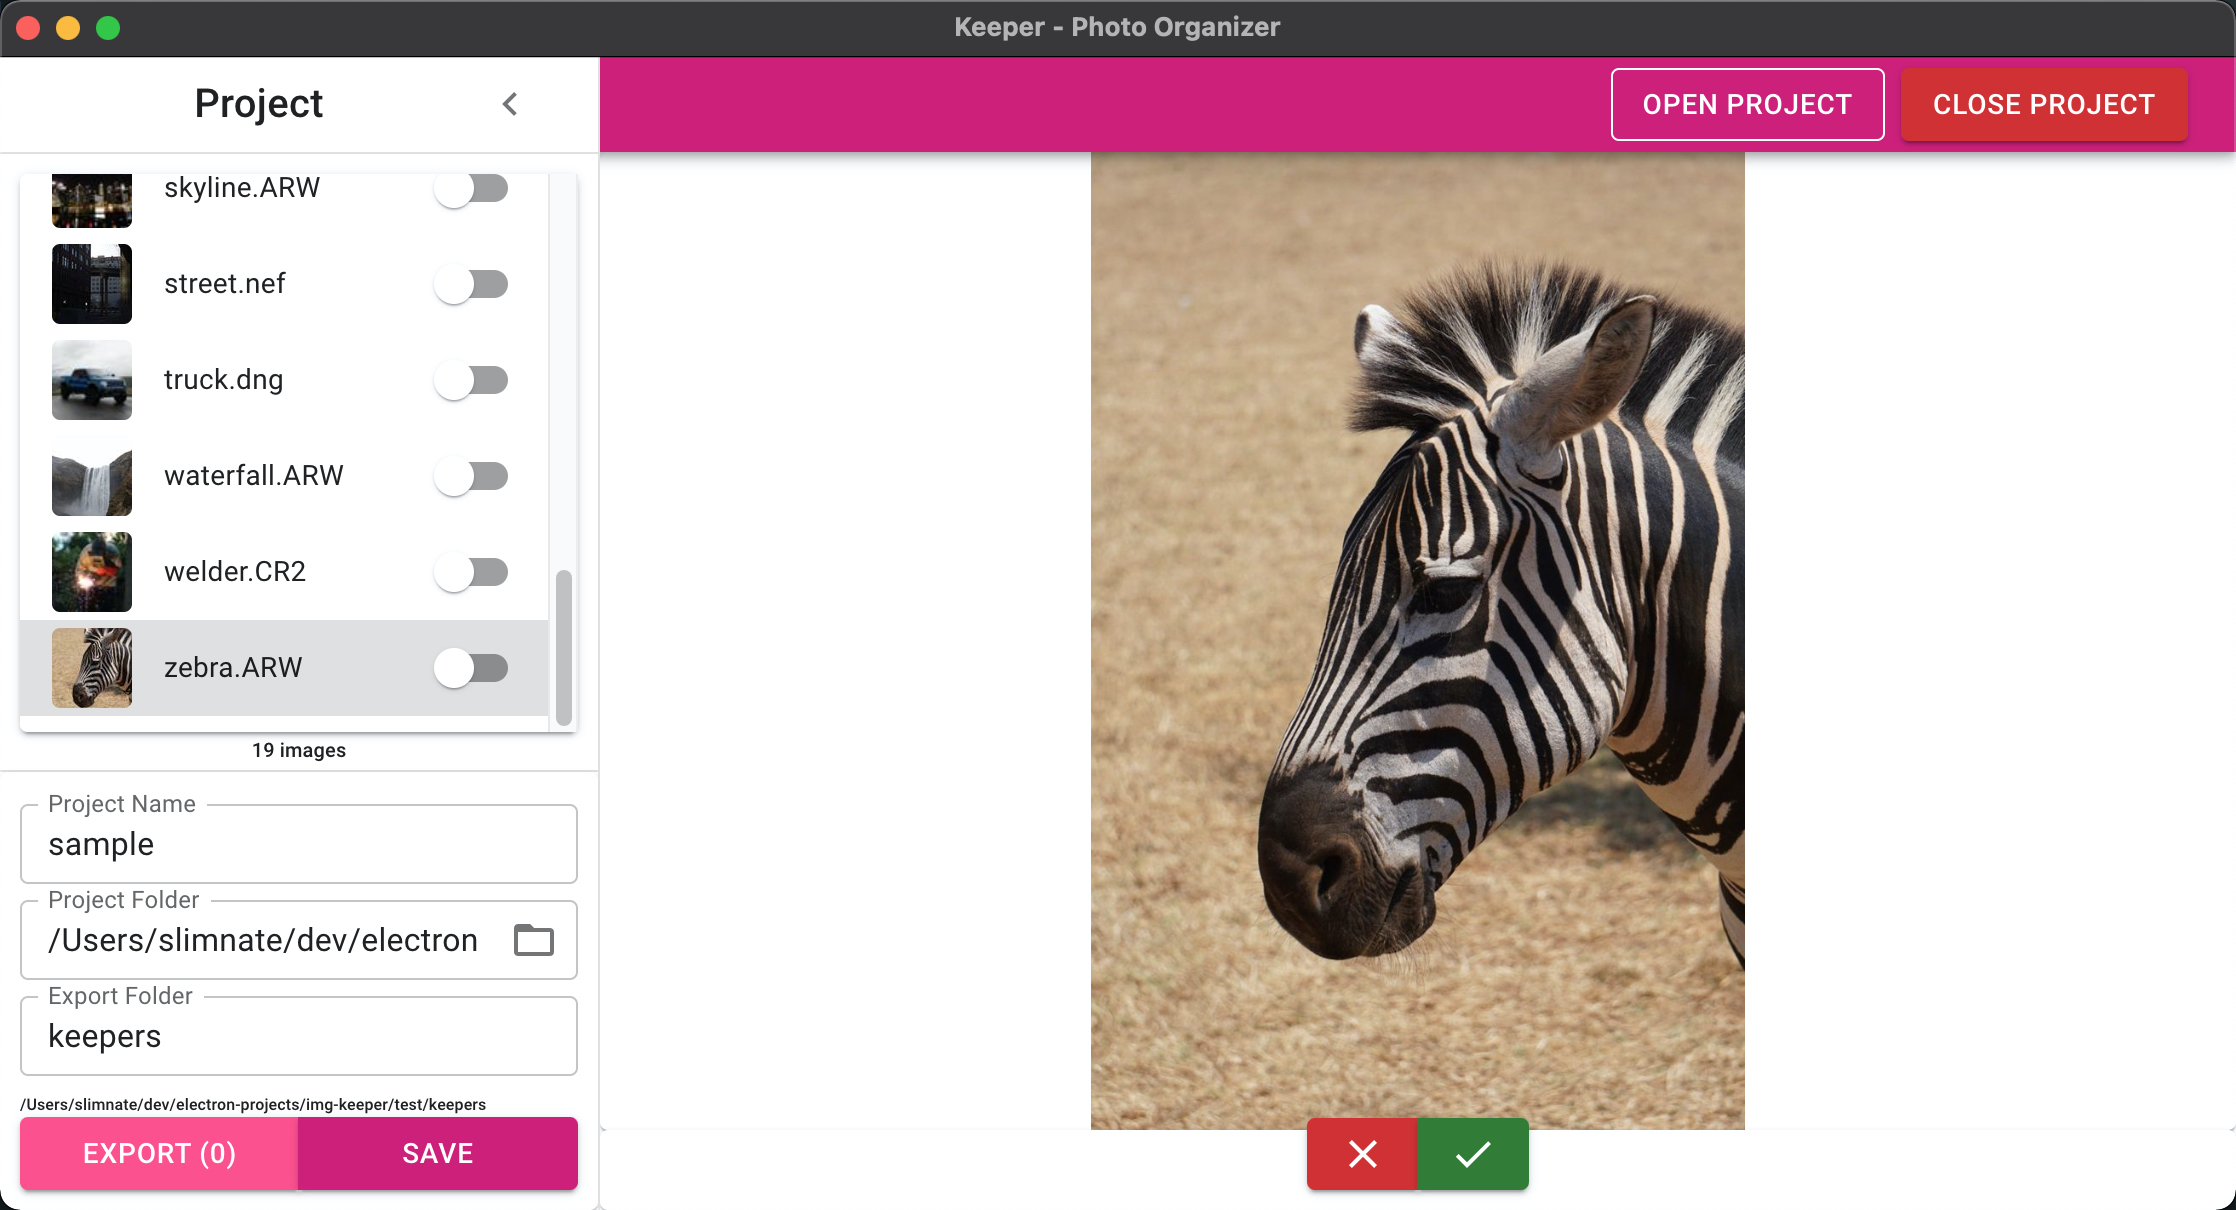
The photographers post-shoot pre-processor. Electron app for photographers to go through a large batch of images, choose which ones to keep, and export those images to a new “keeper” folder.
What + Why?
This project was motivated by watching my photographer girlfriend manually scroll through a folder of images after a photo shoot and manually deleting each one that didn’t make the cut. As manual repetition of a simple task is the worst enemy of a software developer, I decided to do something about it, so came up with the concept for this simple app.
I’ve been working on learning Next.js recently, but didn’t have much experience with React as a framework yet, so I figured this would be the perfect chance to work on my React skills before moving on to other more complex projects using Next.js. The whole process from wireframe to v1.0.0 only took about 2 weeks, and the final product is fairly polished, and provides a pretty substantial increase in productivity for my girlfriend (in addition to some other helpful features), so I’m pretty happy with the process and the overall result.
Goals/Requirements
The general user requirements for this application are:
- Allow user to create/open a
projectfrom a folder of images - Allow user to view a preview of each image in the folder, providing a way to mark each image as
keepornot keep - Allow user to export images marked as
keepto a new folder
Tech Stack
As stated above, one of the goals of this project is to get more experience with React, so that will be the UI framework for the app. For a component library, I chose to go with MUI, a React library implementing the Material UI standard. Since it will be a desktop app but I want to build with web tech, I’ll build everything on top of Electron. This allows me to build the app for multiple different operating systems from a single codebase. It does have some disadvantages though, including large application bundle size, and not being as performant as a native application. However, as high-performance is not a requirement for this application, this is an acceptable tradeoff.
Business Objects
Though we will not be developing in a strictly OOP manner, we can use the basic principles of OOP to define the business objects for this software as follows:
Project
A project will track the state of a project and the images associated with it.
Properties
- name - The name of the project, only used for display in the UI
- projectFile - The path to the project file, a JSON file containing all the project data
- basePath - The base folder for the images of this project
- exportPath - The folder to export the
keepimages to - images[] - A list of all the images in this project along with related data
Methods
- create - Create a new project
- open - Open existing project
- update - Save changes to currently open project
- export - Export images marked
keepto theexportPathfolder
Image
Each project will contain references to many images. These will map 1-to-1 with the images found on the file system.
Properties
- id - unique identifier within the project for the image.
- keep - true if the image should be kept, false otherwise
- previewPath - path to web-compatible preview of the image (might not be the original file if this was a camera RAW image that had to be converted)
- thumbnailPath - path to a scaled down thumbnail version of the image
- path - absolute path to the image
- relativePath - path relative to project
basePath
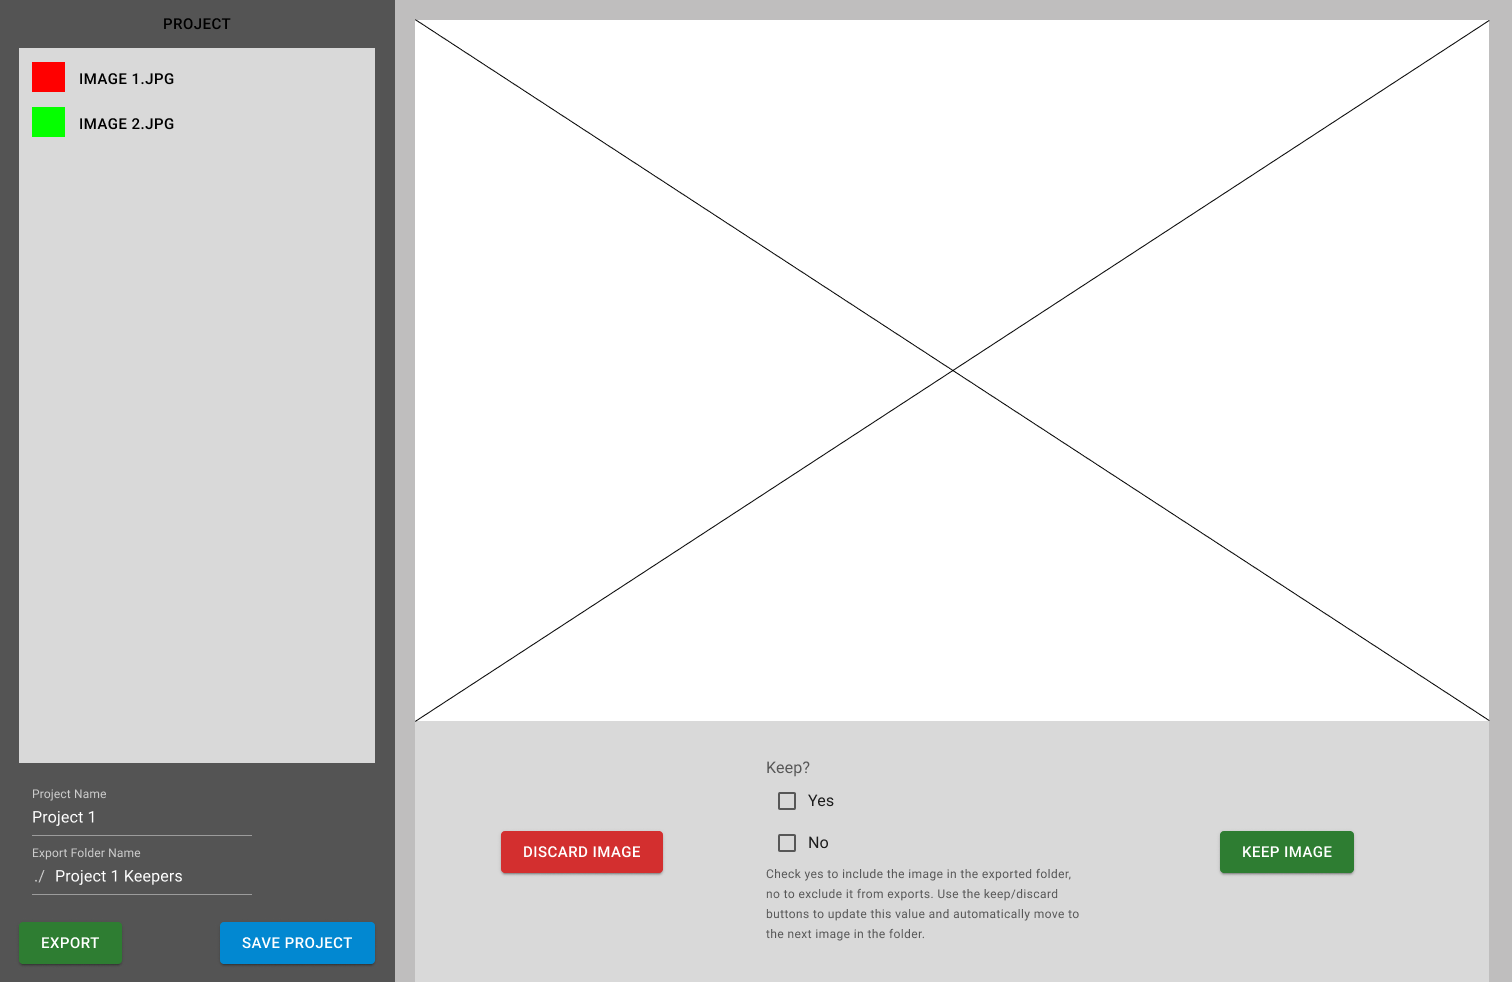
UI Design
I started by creating a basic mockup of how I wanted the UI to be structured. In the end, the UI looked quite different from this mockup, but it was a valuable starting point and reference for the overall structure of the app:
React Components
The following components make up the application:
- Project Creation Dialog
- Allow user to create new project
- Project Open Dialog
- Show file selector to allow user to open existing project
- AppBar
- Show the expander for the project menu, and contains buttons to open/create projects
- Project Panel
- Collapsible side panel that shows details about the current project, list of images, and save/export buttons
- Image Viewer
- Shows the currently selected image and the quick action buttons at the bottom
IPC
In order for the application to interact with the file system, we have to use the IPC (Inter-Process Communication) functionality provided by Electron. This facilitates the communication between the render process (javascript running in the browser) with the main process (the nodejs process that has access to native APIs).
The src/lib/api.js file contains the definitions for all of the API methods that will be exposed to the render process. This project uses the eipc-api library that I developed to easily register IPC methods. For more info on this Automatic IPC API generator, check out the dedicated article here
Registering ATOM protocol
Since our render process cannot access the filesystem directly, I have to register a custom protocol to serve any images needed from the filesystem through the main process:
public/electron.js
1
2
3
4
5
6
7
8
9
    ...

    //register atom protocol
    protocol.registerFileProtocol('atom', (req, cb) => {
        const url = req.url;
        cb({ path: url.substring(7) });
    });

    ...
Handling Camera Raw images
Since many professional cameras save images in a raw format, additional requirements are needed to support those as well - from fileinfo.com:
Camera raw files are image files created by digital cameras. They are saved in an uncompressed and unprocessed format that stores the exact data captured by the camera’s sensor. Because each type of digital camera has a different sensor, many different types of camera raw formats exist. In order to open a camera raw file, the program must support both the file type and the specific camera model that captured the image.
Since the browser cannot render these raw format images, I’ll use the extractd library to convert them to a JPEG preview, and then show this image in the browser. During the initial project creation, check each image file in the folder to see if it’s in a raw format. If so, generate a temporary preview path and save that path to the previewPath property on the image. Then in the render process, check each image for a non-null previewPath, and use that as the src for the <img> tag.
src/lib/api.js
1
2
3
4
5
6
7
8
9
10
11
12
13
14
15
16
17
18
19
20
21
22
23
24
25
26
27
async function generatePreview(destDir, image) {
    let inPath = image.path;
    const inFileName = path.basename(image.relativePath, path.extname(inPath))
    const outPath = path.join(destDir, `${inFileName}_preview.jpg`);
    const isRaw = isRawFormat(inPath);

    // perform raw conversion to jpg using extractd library
    if(isRaw) {
        // update inPath to point to the extracted jpg file
        inPath = await extractd.generate(image.path, { datauri: false, compact: true, persist: true });
    }

    // perform resizing for preview with sharp library
    const sharpImage = sharp(inPath);
    const { width, height } = getNormalSize(await sharpImage.metadata());
    const isLandscape = width > height;

    // shrink image by a factor of 4, with a min width of 1024 for landscape and 768 for portrait
    const requestedWidth = Math.floor(isLandscape ? Math.max(1024, width / 4) : Math.max(768, height / 4));

    await sharpImage
        .rotate()
        .resize({ width: requestedWidth })
        .toFile(outPath);

    return outPath;
}
This introduces one small problem though, which is that the image previews are saved in the OS temporary files, and will be deleted after a period of time. To resolve this we just check each image upon opening an existing project, and if the file at either previewPath or thumbnailPath no longer exists, regenerate the preview image, and update the previewPath and thumbnailPath properties.
src/lib/api.js
1
2
3
4
5
6
7
8
9
10
11
12
13
14
15
16
17
18
19
20
21
22
23
24
25
26
27
28
29
30
31
32
async function openProject(event, filePath) {
    try {
        const project = readProjectFile(filePath);

        //check images for missing previews
        const progress = createProgressNotifier(project.images.length, sendProgressMessage);
        progress.start();

        for(const i in project.images) {
            progress.notify('Validating image...');

            const image = project.images[i];

            // check if preview or thumbnail no longer exist, and regenerate
            if(!fs.existsSync(image.previewPath) || ! fs.existsSync(image.thumbnailPath)) {
                // notify and perform conversions
                progress.notify('Regenerating image preview...');
                project.images[i] = await performConversions(image, getProjectTempDir(project));
            }

            progress.next();
        }

        //re-save project file to update image paths
        writeProjectFile(project);

        return { project };
    } catch (e) {
        console.log({e});
        return { err: e };
    }
}
Image Thumbnails
To improve performance on large projects (projects with 500-1000 30Mb camera raw images are not an uncommon use case), the app will generate 80px wide image thumbnails using the sharp image processing library.
src/lib/api.js
1
2
3
4
5
6
7
8
9
10
11
async function generateThumbnail(image) {
    const inPath = image.previewPath;
    const outPath = inPath.replace('_preview', '_thumb');

    await sharp(inPath)
        .rotate()
        .resize({ width: 80 })
        .toFile(outPath);

    return outPath;
}